
Tuesday, July 27, 2010
Tuesday, May 18, 2010
Megan's Shower
Finally a BOY!!! It's been all girls lately, so we are so excited for Megan to be changin' things up a bit. Surprise, surprise, I made her a carseat cover, but she picked out the top fabric and I love it, it's probably one of my very favorites.
 She's been begging for ideas to decorate the baby's room, though I've seen it half done and it's the cutest boy's room I've EVER seen already! So I made her some of these paper globes and used them to decorate at the shower, too!


 And some tissue pom poms.
 It was so fun to have a break from all the pink and craft with some boy colors! Congrats Meg, we can't wait to meet baby Nydegger!
 She's been begging for ideas to decorate the baby's room, though I've seen it half done and it's the cutest boy's room I've EVER seen already! So I made her some of these paper globes and used them to decorate at the shower, too!
The shower was at Jami's house, who just replaced her carpet. Lots of pink stains were left on her old carpet from my shower, so we decided to go with water this time and just decorate the bottles!
We were having so much fun making projects that we made some favors and a banner together too. I'm pretty sure I don't have any blue/green/orange paper left anymore!
Jami made her famous diaper wreath.
 And some tissue pom poms.
 It was so fun to have a break from all the pink and craft with some boy colors! Congrats Meg, we can't wait to meet baby Nydegger!
Monday, May 10, 2010
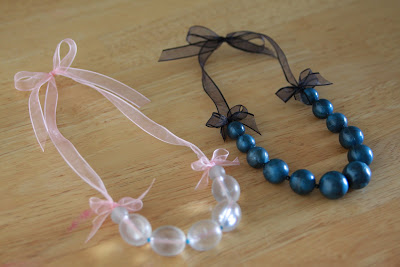
Inspired by: Downtown Powell
When Kiki came to visit, we found the funnest little jewelry shop in downtown Powell where I got these beads. We celebrated Annie's birthday last week so I turned some of the beads in to matching necklaces for us both to wear all the time, together!

Tuesday, April 20, 2010
Kaitlyn's Purse
Do you think my sisters are spoiled?! They always reap the benefits of all the projects I want to try! Kaitlyn has been BEGGING for a purse (since I made Kelsey two). So I finally got around to it using this same tutorial. I think next time I'll try the one with ruffles!

It Was Supposed to be for ME!
Another cheap pattern because I desperately needed a new white skirt. But I ended up making it just a tad too big. Luckily I had Kelsey for Christmas, so I gave it to her as her gift!


I made this one months ago so I don't remember which one I did, but here it is anway. Much simpler than the dress.
Dress for a Little One
Every time patterns go on sale for $.99-1.99, you should buy at least one! So this was the last one I bought from Joann's. But you can get it here as well.
 I made the one featured in the picture, but added a ruffle around the neckline, a fabric lining around the body of the dress and a few flowers, including a removable clip on the top.
The "funniest" part about this dress is that it's actually BACKWARDS!!! I was completely done and feeling so accomplished, but decided to add a few flowers (with fabric glue because I had already put the sewing machine away). Then I realized I glued them to the back of the dress... what the "h"?! Oh well, they ARE NOT coming off, so I'm just going to make a couple of more to put on the front of the dress, then their will be flowers all over!

More Pillows & a Little Extra
Back to Bexley's pre-earth BFF. We put together a whole new futon for little Alysa's room to match her bedding. For the futon cover I just made a fitted sheet...easiest project on earth:
1 - cut out one rectangle of desired fabric (with a few inches extra all around).
2 - Double fold and iron edges all the way around.
3 - Sew hem (leaving an opening).
4 - Pull elastic all the way through. Sew end pieces of elastic together. Sew opening closed.
DONE!
And just a few more pillows using this tutorial.
 Just one more week til we get to meet her!
Subscribe to:
Posts (Atom)
